Issues
在开发中遇到的问题都将记录在本篇中,持续更新。
- 缩短 App Store 中应用链接
- unable to load standard library for target ‘arm64-apple-ios10.0-simulator’
- Xcode 10 beta – Build Error: “Multiple commands produce” Workaround
- -[<CALayer: 0x283cc4f60> display]: Ignoring bogus layer size
- presentViewController 时卡顿
- SmartSVN: File has inconsistent newlines
- The request was denied by service delegate (SBMainWorkspace) for reason: Unspecified.
- Cannot link python3 in MacOS High Sierra
- set system viewController’s tintColor
- 零点更新
- 跳转 App Store 并打开评论页面
- 判断 targets
- Sourcetree Error: Permission denied (publickey)
- 在 XML 中输入
<>字符 - ChildViewController.view.frame in UIView present different value
- Automatically manage signing
- 超出父视图的子视图的事件响应
- 解决 UITextField 输入中文时内容下移
- 在 Today Extension 中输入文字
- 终端里的 bogon 及解决方法
- iOS 8 下 UITableViewCell 不能左滑
- 禁止 UIAlertView 消失
- 错误捕获
- 导航栏随页面 push 或 pop
- CocoaPods 搜索不到最新的第三方库
# 缩短 App Store 中应用链接
App Store 中应用链接如
https://itunes.apple.com/us/app/icollect/id1333958571?mt=8、
https://itunes.apple.com/us/app/icolor-%E4%B8%AD%E6%97%A5%E4%BC%A0%E7%BB%9F%E9%A2%9C%E8%89%B2%E5%8F%8A%E6%B8%90%E5%8F%98%E8%89%B2/id1329896441?mt=8
等,非常的冗长,但是其中 App 名称(App Store 中显示的名称)、地区、参数都是不必须的,完全可以去掉,去掉后如
https://itunes.apple.com/app/id1333958571、
https://itunes.apple.com/app/id1329896441。
嗯~ 短了许多呢,分享出去也更优雅呢。
- ps: 推荐个脚本 Link-cleaner,链接地址洗白白,把链接地址缩减至最短可用状态 👍
# unable to load standard library for target ‘arm64-apple-ios10.0-simulator’
使用 脚本 合并模拟器和真机 framework 时报了这个错,查了半天发现编译前只要把模拟器选中 Generic iOS Device 即可。😂
相关链接:
- 手把手教你高效快捷的创建 Swift Framework
- error: unable to load standard library for target ‘arm64-apple-ios10.0-simulator’?
# Xcode 10 beta – Build Error: “Multiple commands produce” Workaround
使用 Xcode 10 beta 时遇到了下面的错误:
error: Multiple commands produce ‘/Users/xiaoyuan/Library/Developer/Xcode/DerivedData/Test-gnxeuntgkenwgdgycqnvabqubafh/Build/Products/Debug-iphoneos/Test.app’:
- Target ‘Test’ has create directory command with output ‘/Users/xiaoyuan/Library/Developer/Xcode/DerivedData/Test-gnxeuntgkenwgdgycqnvabqubafh/Build/Products/Debug-iphoneos/Test.app’
- That command depends on command in Target ‘Test’: script phase “[CP] Copy Pods Resources”
可以尝试以下方法解决:
- 升级 CocoaPods 到最新版本
- 选中项目 target -> Build Phase -> [CP] Copy Pods Resources -> Output Files -> 移除
${TARGET_BUILD_DIR}/${UNLOCALIZED_RESOURCES_FOLDER_PATH} - 修改 Workspace 设置:File -> Workspace Settings -> Build System 改为
Legacy Build System-> Done
👉 Xcode 10 beta3 Error: Multiple commands produce
👉 Xcode 10 beta 3 – Build Error Workaround
# -[<CALayer: 0x283cc4f60> display]: Ignoring bogus layer size
在使用 CoreText 排版长文时,CALayer size 太大,页面显示空白,把 CALayer 换成 CATiledLayer 即可。
1 | override class var layerClass: AnyClass { |
👉 https://stackoverflow.com/questions/2757334/calayer-0x5584190-display-ignoring-bogus-layer-size
# presentViewController 时卡顿
只是 present 一个简单的 ViewController,并没有任何复杂操作,在第一次 present 时居然卡顿 3s 左右,WTF。搜索网络后发现是前一个页面的 tableView 设置了 UITableViewCellSelectedStyleNone 造成的,去掉后明显快了许多。
或者异步 present:
1 | DispatchQueue.main.async { |
# SmartSVN: File has inconsistent newlines
这个问题是由文件的编码不一致造成的,如混合了 Windows 和 Unix 符号。解决办法有两个:
- 统一编码:如使用编辑器打开文件,统一编码后保存;
- 修改 SmartSVN 提交前的检查设置:Project –> Setting –> Working copy –> EOL-style –> Default EOL-style,设置为 As is(no conversion)。
# The request was denied by service delegate (SBMainWorkspace) for reason: Unspecified.
Xcode Version 9.3. 在模拟器上遇到这个问题。
重启下模拟器就 OK 了。。。
# Cannot link python3 in macOS High Sierra
homebrew 安装 Python3 最后一步链接错误:
Permission denied @ dir_s_mkdir - /usr/local/Frameworks
解决办法:
1 | $ sudo mkdir -p /usr/local/Frameworks |
参考
# set system viewController’s tintColor
SFSafariViewController
1 | if #available(iOS 10, *) { |
Others
1 | // eg: MFMailComposeViewController, UIImagePickerController... |
# 零点更新
1 | ... |
UIApplicationSignificantTimeChange 在文档中解释为:
Posted when there is a significant change in time, for example, change to a new day (midnight), carrier time update, and change to or from daylight savings time.
当时间发生重大变化时发此通知,例如更改为新的一天(午夜),更新运营商时间以及更改为夏令时或从夏令时更改。
# 跳转 App Store 并打开评论页面
1 | let appID = "1329896441" |
# 判断 targets
Swift
TARGETS -> Build Settings -> Other Swift Flags,添加一个变量如 -DTODAY_EXTENSION,注意 -D 开头,代码中就可以判断当前 target 是否是 today extension:
1 | #if TODAY_EXTENSION |
Objective-C
TARGETS -> Build Settings -> Preprocessor Macros,添加一个变量如 TODAY_EXTENSION=1,
1 |
|
参考
# Sourcetree Error: Permission denied (publickey)
使用 Sourcetree 生成的 SSH Key 连接 GitHub,公钥已添加,遇到如下错误:
Please make sure you have the correct access rights
and the repository exists.
git@github.com: Permission denied (publickey).
fatal: Could not read from remote repository.
最后发现是因为生成的 SSH Key 没有添加到 ssh-agent 中,将密钥添加后即可正常连接。
1 | # KiligWYu-GitHub 为私钥名字,请替换 |
# 在 XML 中输入 < > 字符
< → <,> → >
1 | <!--- <string>(。>﹏<)哈啾</string> ---> |
# ChildViewController.view.frame in UIView present different value
This is due to the autoresizingMask of the childVC.view. By default this is set to have flexible width and height. So if you set the frame of the container and then the frame of the childVC.view then you get the actual value you set but if you reverse it and set the frame of the childVC.view and then the container the frame of the childVC.view is automatically updated to have the same relative width and height.
For example if the frame size for the container was 100 x 100 and then you change it to 200 x 200 the frame size for childVC.view will be doubled.
To remove this set the childVC.view.autoresizingMask = [] so it remains as you set it.
# Automatically manage signing
-
TARGET -> General -> Signing,勾选 Automatically manage signing,会有 Automatically manage signing will reset build settings 的提示,点 Enable automatic;
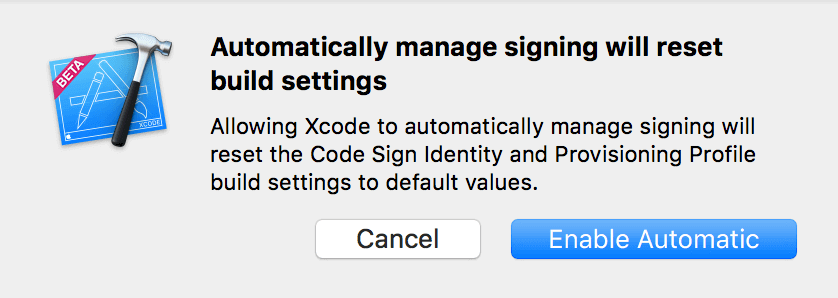
图 1: Automatically manage signing will reset build settings -
选择一个 Team,可能需要 Revoke 一个证书;
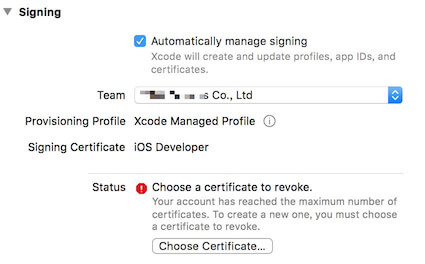
图 2: Choose a certificate to revoke -
点 Choose Certificate,
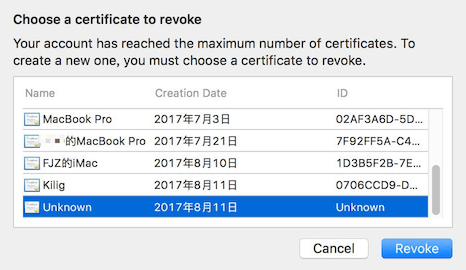
图 3: Choose Certificate选中一个,然后 Revoke。
-
Done。
其实我想说的是下面这些:
- 使用 Automatic manage signing 创建的证书,名字为电脑的名字(电脑名字可以在 System Preferences -> Sharing -> Computer Name 处修改),如
xxx的iMAC、xxx的MacBook Pro、Kilig等,手动创建的证书名字为Unknown,如图 3; - 第 2 步如需 revoke 证书,可先手动创建一个再 revoke 掉,不要 revoke 别人的证书;
- 使用 Automatic manage signing 最多只可以创建 10 个证书,超过了就不能 automatic… 了 [摊手]
# 超出父视图的子视图的事件响应
子视图超出父视图后,如果 clipsToBounds 不为 YES,会显示出完整的子视图,但是超出部分不响应事件。如要响应事件可以重写父视图的 hitTest:withEvent: 方法:
1 | - (UIView )hitTest:(CGPoint)point withEvent:(UIEvent )event { |
# 解决 UITextField 输入中文时内容下移
UITextField 在输入中文时内容会向下偏移,简单的解决办法是设置 UITextField 的 clearButtonMode,还有办法就是继承 UITextField 重写 textRectForBounds: 和 editingRectForBounds:。
参考
# 在 Today Extension 中输入文字
在做花密的 widget 时,需要在通知中心输入密码和代号。通知中心是无法直接输入文字的,不会弹出键盘,但是 present 出来的 viewController 可以弹出键盘输入文字,需要 iOS 10 以上。
详见
# 终端里的 bogon 及解决方法
Mac 下的终端经常有时候前面的计算机名会错误的显示成 bogon. 这是因为终端会先向 DNS 请求查询当前 IP 的反向域名解析的结果,如果查询不到再显示我们设置的计算机名。而由于我们的 DNS 错误地将保留地址反向的 NS 查询结果返回了 bogon. 其中 bogon 本应该用来指虚假的 IP 地址,而非保留 IP 地址。因此就出现了会时不时地打印 bogon 这种奇怪名字作为计算机名的现象了。
解决方法:
$ sudo hostname YOUR-DESIRED-HOST-MAME
$ sudo scutil –set LocalHostName HOSTNAME
$ sudo scutil –set HostName HOSTNAME
参考
# iOS 8 下 UITableViewCell 不能左滑
需要加上以下的空方法:
1 | - (void)tableView:(UITableView )tableView commitEditingStyle:(UITableViewCellEditingStyle)editingStyle forRowAtIndexPath:(NSIndexPath )indexPath { |
参考
https://gist.github.com/scheinem/e36835db07486e9f7e64
# 禁止 UIAlertView 消失
新建类 AlertView 继承 UIAlertView,添加属性 shouldDismiss,重写 dismissWithClickedButtonIndex:animated: 方法:
1 | // AlertView.h |
# 错误捕获
捕获错误,在下次启动时弹出错误详情:
1 | - (BOOL)application:(UIApplication )application didFinishLaunchingWithOptions:(NSDictionary )launchOptions { |
# 导航栏随页面 push 或 pop
在 viewWillAppear 或 viewWillDisappear 中用 setNavigationBarHidden:animated: 方法设置 NavigationBar。
1 | [self.navigationController setNavigationBarHidden:YES animated:YES]; |
# CocoaPods 搜索不到最新的第三方库
由于 CocoaPods 搜索是搜索的本地库,如果搜不到最新的第三方库,更新下本地库即可:
$ pod setup